Authorization Code Flow with PKCE (OAuth) in a React application
Auth0OAuthReact
I’ve been working with OAuth a lot lately. Just recently, I wrote about setting it up for grafana. Today, I want to talk about the recommended flow for Single Page Applications, Authorization Code Flow with PKCE. I’m going to add authorization to a React application leveraging Auth0 as an Identity Provider.
I mention Auth0 so often around here, you’d think I’m getting a referral bonus. I promise you I’m not! It’s deserved praise. The UI is easy to navigate, is conveniently provisioned with Terraform, and has powerful libraries for most programming languages. I wrote about verifying JWTs from a SpringBoot backend in the past. Now it’s time to talk about the frontend.
Choosing the right flow
OAuth is not a monolithic entity. There are so many flows it’s no wonder people still succumb to the temptation of Basic Auth. The first step always is choosing the right one. Given that an SPA can’t store a secret id (the source code is sent to the browser, you know), we have two possibilities.
Implicit Flow
Traditionally, SPAs tended to use the implicit flow, also known as the implicit grant type. You make a request to the authorize endpoint with response_type=token id_token. It looks like this:

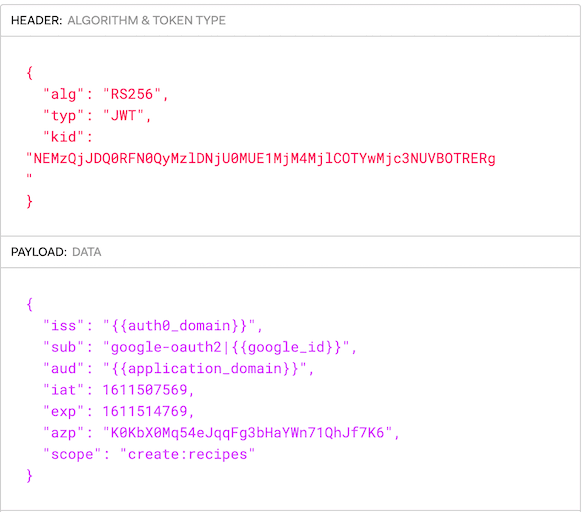
Typically, you lack authentication for the first request, so you’ll land in a login screen artfully presented by Auth0. Afterward, the response is a redirect (302) with an access_token and an id_token appended to the URL as query parameters. The access_token is a JWT similar to this:
Now that you’ve learned about this flow, you can pretty much forget about it. Implicit flow is no longer considered the best option for SPAs. Instead, if you’re implementing a new application you’re advised to use the Code Flow with PKCE because it’s more secure. Don’t you love the argument by security?
Code Flow with PKCE
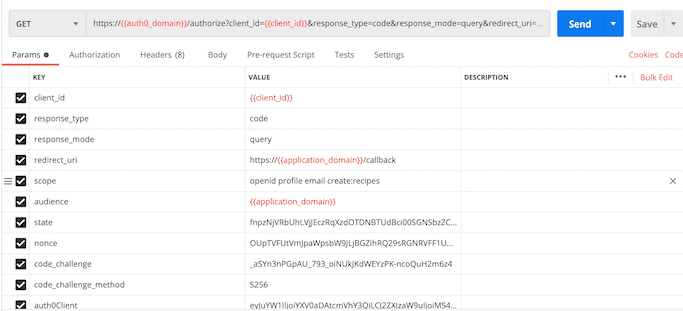
This is an enhanced version of the Code Flow that doesn’t require a client secret (remember, no secret in SPA code). Like before, we use the authorize endpoint, this time with a different response_type. We include a code_challenge as well.
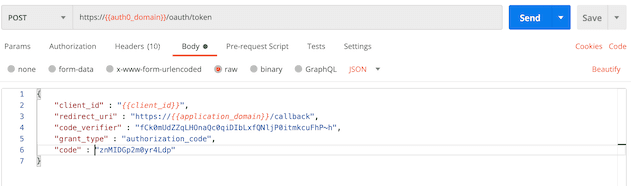
If you’re authorized, the response is a redirect again. This time, we are getting a code appended to the URL as a query parameter. To obtain the token, we need to make another request to the oauth/token endpoint (a POST this time) with the code we got and the code_verifier we used to generate the challenge.
This call returns the access_token and id_token as part of the body, ensuring that we don’t store tokens in our browser history.
Using the right library
Alright, we’re getting in the flow. Our next step is extending our application to actually use OAuth. Implementing it by hand is error-prone and cumbersome. Spare yourself the trouble and use a library instead. Auth0’s seems to be trying to corner the market, as they have three different JavaScript libraries. I’ve worked with all three in some capacity, but as of today, I endorse auth0-react as the most convenient one. Let’s see some code samples.
Auth0 provider
This library uses the Context API. We have to instantiate a component called Auth0Provider with the parameters for our connection with Auth0 that we get from the application associated with the UI.
const host = () => process.env.REACT_APP_HOST || ''
const redirectUri = () => `${host()}/callback`

render(
  <BrowserRouter>
    <Auth0Provider
      domain="{{auth0_domain}}"
      clientId="{{client_id}}"
      scope="openid profile create:recipes"
      audience="{{application_domain}}"
      redirectUri={redirectUri()}
    >
      <App />
    </Auth0Provider>
  </BrowserRouter>,
  document.getElementById('root')
)
Triggering the login flow
In our code, we use a hook to interact with Auth0. We get a whole bunch of stuff from the hook. For our example, we’re interested in knowing if the user is authenticated. We need login and logout functions as well.
const Navigation: React.FC = () => {
  const {
    loginWithRedirect,
    logout,
    isAuthenticated,
  } = useAuth0()

  return (
    <AppBar data-testid="navigation">
      <Toolbar>

        {!isAuthenticated && <Login onClick={() => loginWithRedirect()} />}

        {isAuthenticated && (
          <Logout onClick={() => logout({ localOnly: true })} />
        )}

      </Toolbar>
    </AppBar>
  )
}
If you have worked with hooks already, you’ll have seen this pattern. Once we click on the login button, the OAuth dance begins. We land on a form like this:

After the authentication, Auth0 redirects back to the URL defined in the redirectUri specified above. I put a Callback component under that route that waits for the process to finish. That appears to work better than waiting on the main component directly.
const Callback: React.FC = () => {
  const { isLoading } = useAuth0()

  return (
    <>
      {!isLoading && <Redirect to="/" />}
      <p>Waiting for log in to be confirmed</p>
    </>
  )
}
Subsequently, isAuthenticated is true, and we have access to the user data. You can configure the provider to store the token in localStorage, but that’s apparently a security risk so forget I mentioned this.
Making API calls
Displaying the user’s data is nice, but the crucial part is making sure that we include our token when querying the backend. This token is then verified, and then actual useful things ensue.
Again we make use of the useAuth0 hook. I’m after the getAccessTokenSilently method, which returns the token if present or makes a silent request if not.
const Submitter: React.FC<Props> = ({ history }: Props) => {
  const { getAccessTokenSilently } = useAuth0()

  return (
    <Formik
      initialValues={initialValues}
      validationSchema={validationSchema}
      onSubmit={async (values: RecipeForm) => {
        const accessToken = await getAccessTokenSilently({})
        const response = await newRecipe(values, {
          Authorization: `Bearer ${accessToken}`,
        })

        fold(
          response,
          (error) => console.log('Error happened: ', error.code),
          (response) => history.push(`/recipes/${response.id}`)
        )
      }}
    ></Formik>
  )
}
The token needs to be included as a bearer token in any API request that requires authorization. We might get fancy by passing different scopes to the getAccessTokenSilently method if we need granular permissions. That’s too much for this simple app, though.
Summary
I’ve seen some nasty, bespoke approaches to handle authz/authn, especially when frontend code is involved. Do not roll your home-cooked solution, it’s likely to be much more complex and probably a lot more insecure. With Auth0 most of the work is already done for you. You might as well use it!