Secure a Rails API with Auth0
RubyRailsOAuthSecurityAuth0
If you want to expose an API publicly on the Internet, authorization will be a requirement for you sooner or later. You want to verify that the client consuming the API has the appropriate permissions.
This guide is exactly about that. We’ll be securing an API written using Ruby On Rails, with Auth0 as the authorization server.
There’s a repository with the code so that you can follow along in Github.
Securing an API
I didn’t explain what I mean by securing an API yet. Essentially, we’re ensuring that protected routes are accessible only for the users with enough rights.
When it comes to security, it’s generally considered a bad idea to roll your own bespoke implementation. Instead, I’m using OAuth, a battle-tested and widely used authorization framework for web applications.
In this context, Auth0 fulfills the role of the Authorization Server and abstracts a significant part of the work away from us. That way, we can focus on delivering value to our users.
Without getting into too many details on how OAuth works, we assume that calls to our API will include a bearer token, using the industry-standard JWT format. The token contains a series of claims regarding the its issuer, how long is it valid, and what rights are granted by it. Let’s have a look at a sample token:
{
  "iss": "https://yourTenant.eu.auth0.com/",
  "sub": "zHwnsh0j2sTj4u3ss6YedSFrzyb2",
  "aud": "https://targetAudience.com",
  "iat": 1621369130,
  "exp": 1791455530,
  "azp": "ThEkgdG1NndLlWoNMcEdEr2KJIs9vKad",
  "scope": "openid profile read:admin-messages",
  "permissions": ["read:admin-messages"]
}
We’re going to implement verification for that token, and reject requests that don’t have the required permissions.
Getting Started
We’re getting started with our base application, bootstrapped with Rails 6. This branch is a good starting point. You can download it by running the following command in a terminal window:
git clone -b starter --single-branch https://github.com/sirech/example-jwt-validation-rails.gitThe API has three endpoints with different levels of protection:
/api/messages/public: Public route./api/messages/protected: Requires a valid access token./api/messages/admin: Requires a valid access token. Since Auth0 uses JWT as its access token format, we can inspect it and make sure it has apermissionsclaim that contains the scoperead:admin-messages.
Running the Application
To run the application, we first need the correct ruby version. The easiest way to do so is to use a version manager like rbenv. Once you install it, run this command inside the repository to install the right version of ruby:
rbenv installInstall the dependencies for the application:
bundle installAnd finally, run the application:
bin/rails sYou can verify that the application is working correctly with curl:
curl localhost:6060/api/messages/publicThe command will return a 200 code, plus the message:
{"message":"The API doesn't require an access token to share this message."}Creating an API on Auth0
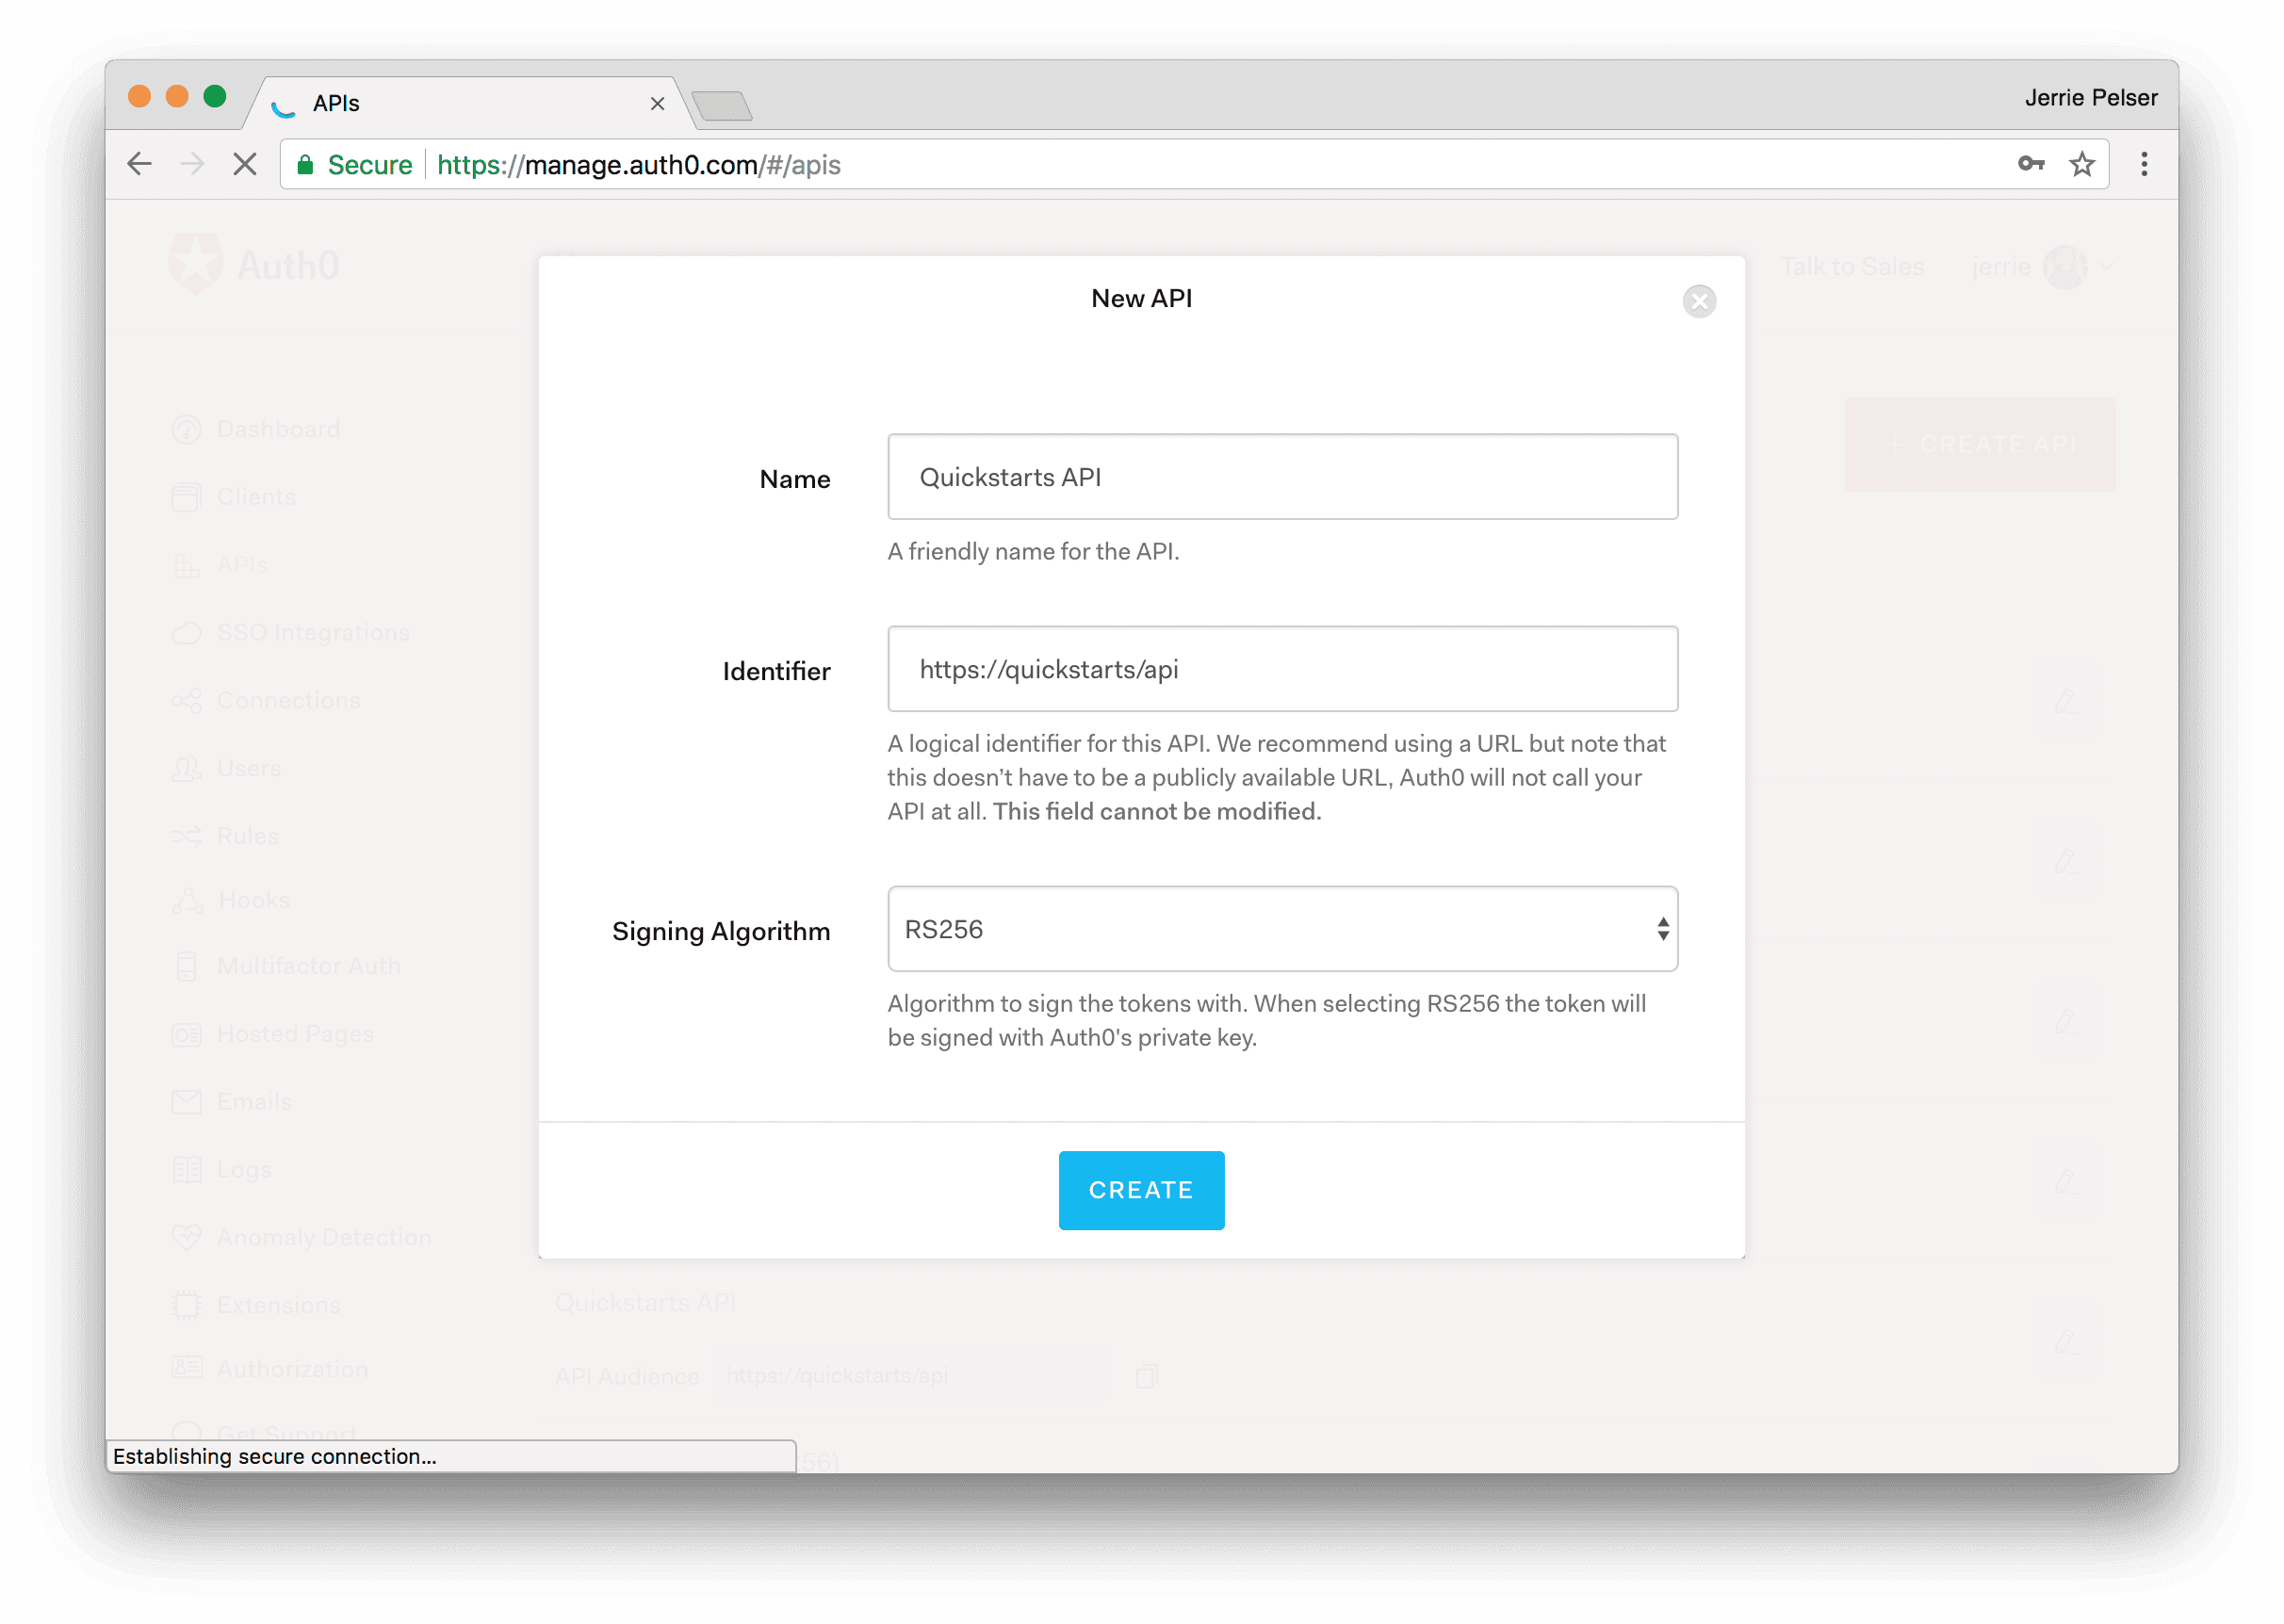
To secure the API with Auth0, you need an Auth0 account. If you haven’t one, you can sign up for free right now. In the APIs section of the Auth0 dashboard, click Create API. Provide a name and an identifier for your API. You will use the identifier as an audience later, when you are configuring the access token verification. Leave the Signing Algorithm as RS256.
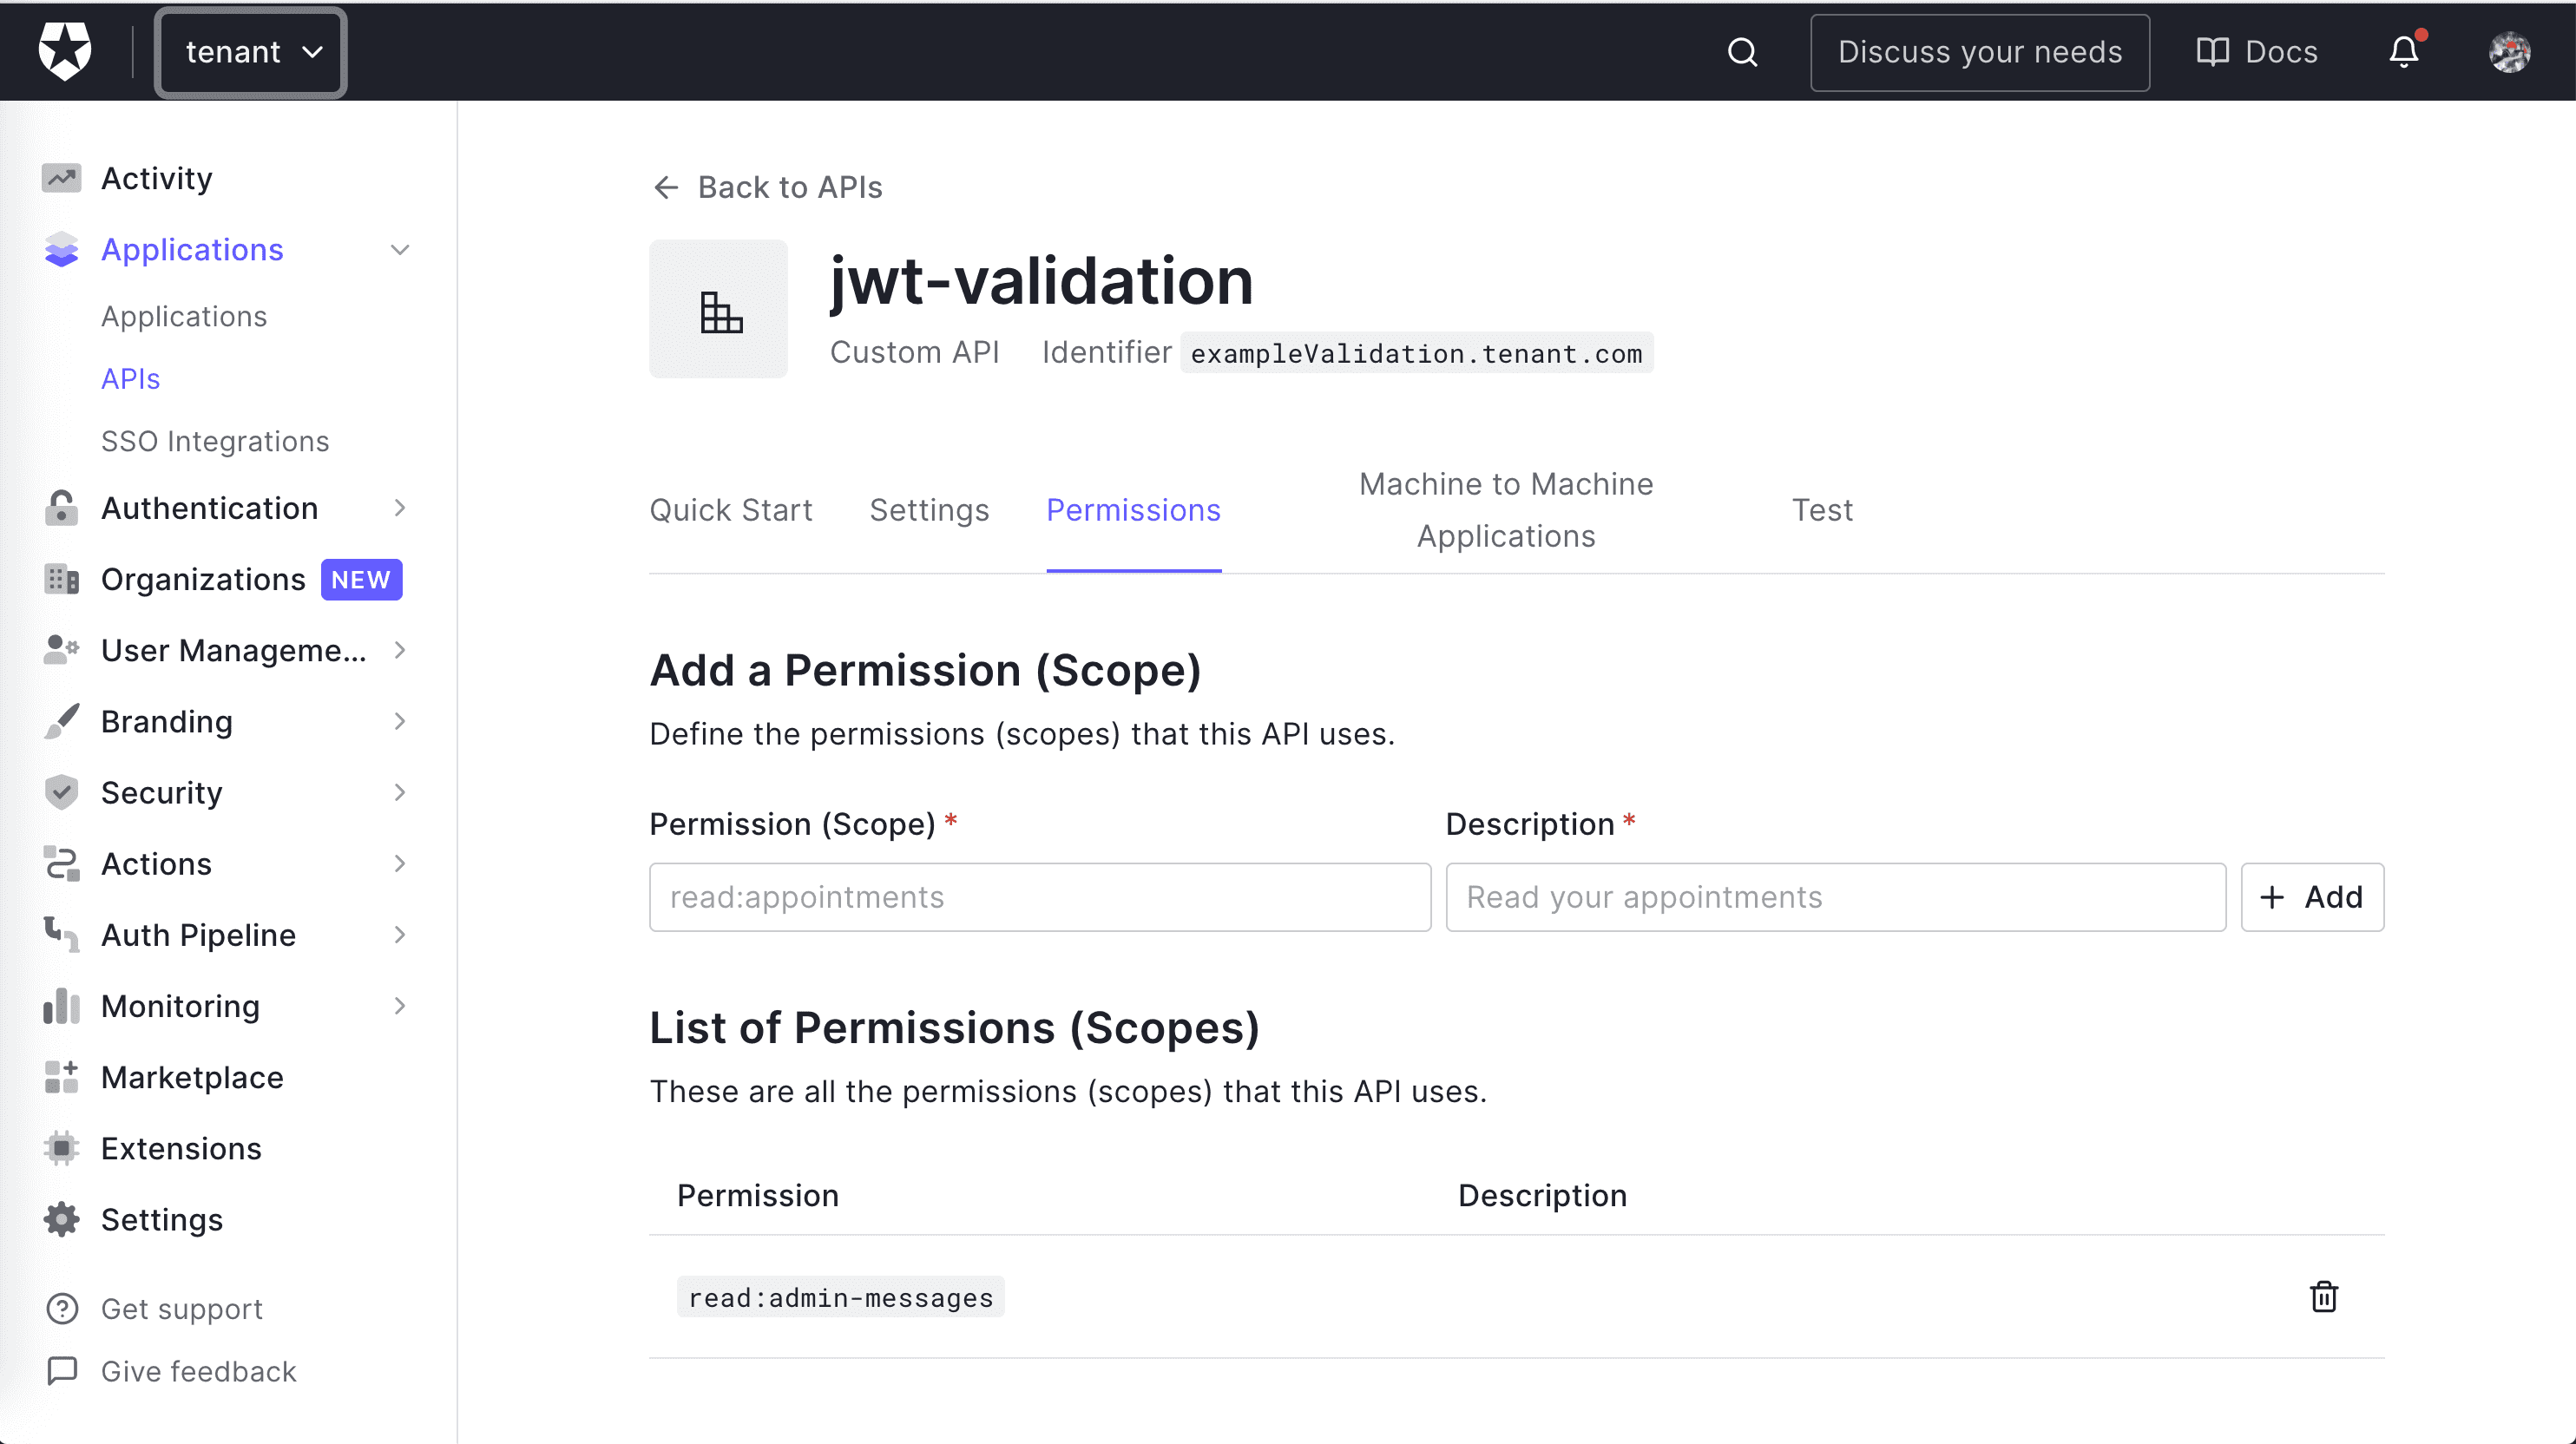
Once you’ve created the API. Go to the Permissions tab in the API details and add a permission called read:admin-messages.
Note: While you are in the Auth0 Dashboard, take note of your Auth0 domain. You will need it soon. This is a string in the form
YOUR-TENANT-NAME.auth0.comwhereYOUR-TENANT-NAMEis the name you provided when you created your account with Auth0. For more information, check the documentation.
Preparing the Application for Validation
Alright, our application is ready to go and in dire need of some security. Before that, we need to add some configuration.
You dutifully stored the domain and the audience after creating the API, right? Let’s use them. In the Rails world, the convention is to add this in the config folder, using YAML. The file is called config/auth0.yml.
We don’t want to store credentials in our code, so we’ll export the values as environment variables, named AUTH0_DOMAIN and AUTH0_AUDIENCE. The configuration uses those values, and keeps them safely away from source control!
development:
  issuerUri: <%= ENV["AUTH0_DOMAIN"] %>
  audience: <%= ENV["AUTH0_AUDIENCE"] %>
Now, set AUTH0_DOMAIN and AUTH0_AUDIENCE environment variables to the domain and audience values for your API.
With this, the application is ready to connect with Auth0. Let’s move on to the implementation.
Validating the Access Token
Before we get started, let’s talk for a second about authentication frameworks for rails. There are a bunch of alternatives in the ecosystem, such as CanCanCan, or devise.
However, our case is an awkward fit for those. We don’t want to take over user management. We only want to validate tokens issued by the authorization server. In this case, using a framework won’t bring us as much benefit as something like, say, Spring Security. That’s why we only rely on an extra gem, jwt.
The code implementing the authorization check lives in the add-authorization branch. Let’s see how it works!
Utilizing the JWT Library
The jwt library brings a whole lot of functionality to make our API able to validate and manage tokens in JWT formats as the ones issued by Auth0. We need to do three things:
- We need to fetch the JWKS configuration from Auth0, so that we know what is the public key to verify the access token signature
- With the public key, the issuer, and the audience, we want to verify the token
- After verifying the token, we’re decoding it to access the
permissionsclaim (or any other information contained in the token, really)
Decoding the Token
Let’s get down to business. We’re implementing the verification/decoding logic in the lib folder, in a file called json_web_token.rb. We’re starting by fetching the JWKS data:
# lib/json_web_token.rb
require 'jwt'
require 'net/http'

class JsonWebToken
  class << self
    def algorithm
      'RS256'
    end

    def key(header)
      jwks_hash[header['kid']]
    end

    def jwks_hash
      jwks_raw = Net::HTTP.get URI("#{issuer}.well-known/jwks.json")
      jwks_keys = Array(JSON.parse(jwks_raw)['keys'])
      jwks_keys.map do |k|
        [
          k['kid'],
          OpenSSL::X509::Certificate.new(Base64.decode64(k['x5c'].first)).public_key
        ]
      end.to_h
    end

    def issuer
      "https://#{Rails.application.config.x.auth0.issuerUri}/"
    end
  end
end
As you can see, through the issuerUri we know where to look for the data. Then, we parse the key so that we can consume it in the library.
The next step is to add an extra method to the class, verify, that verifies and decodes the token at the same time:
# lib/json_web_token.rb
class JsonWebToken
  class << self
    def verify(token)
      JWT.decode(token, nil,
                 true, # Verify the signature of this token
                 algorithm: algorithm,
                 iss: Rails.application.config.x.auth0.issuerUri,
                 verify_iss: true,
                 aud: Rails.application.config.x.auth0.audience,
                 verify_aud: true) do |header|
        key(header)
      end
    end

    # ... existing code ...

  end
end
This is all the code that we need for the actual verification. Neat, isn’t it? But our controllers are still insecure. Not for long, though.
Protecting the Endpoints
To make it as convenient as possible, we’re creating a hook that we’re going to run before any route that needs authentication. To make it available for every controller, it lives in the app/controllers/application_controller.rb:
# app/controllers/application_controller.rb
require 'json_web_token'

class ApplicationController < ActionController::API
  def authorize!
    valid, result = verify(raw_token(request.headers))

    head :unauthorized unless valid

    @token ||= result
  end

  private

  def verify(token)
    payload, = JsonWebToken.verify(token)
    [true, payload]
  rescue JWT::DecodeError => e
    [false, e]
  end

  def raw_token(headers)
    return headers['Authorization'].split.last if headers['Authorization'].present?

    nil
  end
end
We take the token from the standard Authorization header. Then, we verify it with the code from the previous section. There are two possible paths after running authorize!:
- If the token isn’t there, or it’s invalid for any reason, the processing stops right there, and the call returns a 401
- If the token is valid, we continue the execution and store the token in
@tokenso that it’s available
We’re protecting both the protected and the admin routes with this hook, thanks to before_action:
# app/controllers/api/messages_controller.rb
module Api
  class MessagesController < ApplicationController
    before_action :authorize!, except: %i[public]
end
Custom Error Messages
Don’t you feel better knowing that the application is not exposing private stuff anymore? I definitely do. But we got to help our users. A blank 401 message might not give them enough information to debug the issue. Let’s extend the hook to return something more explicit:
# app/controllers/application_controller.rb
class ApplicationController < ActionController::API
   def authorize!
     valid, result = verify(raw_token(request.headers))

     # 👇 old code
     # head :unauthorized unless valid
     # 👇 new code
     render json: { message: result }.to_json, status: :unauthorized unless valid

     @token ||= result
   end
Now we get a message that’s more helpful than an HTTP code without a body.
Testing the Protected Endpoints
Let’s test the protected endpoint:
curl localhost:6060/api/messages/protectedThe command will return a 401, because we’re not authorized. We need to get a valid token from Auth0.
The simplest way is to access the API section of your Auth0 Dashboard again, select the API that you created before and click the Test tab. In this section, you can get a temporary token to test your Web API by clicking the Copy Token icon as shown in the following picture:

Let’s attach the token to the request:
export TOKEN=the-test-token
curl localhost:6060/api/messages/protected -H "Authorization: Bearer $TOKEN"
The request works now!
{"message":"The API successfully validated your access token."}Checking for permissions
There’s one requirement pending. As you might recall, for /api/messages/admin a valid token isn’t enough. Rather, we expect the correct permission in the permissions claim. This extra check allows us to define more granular access criteria for our endpoints. This functionality is implemented in the add-rbac branch.
We’re adding a new method in the application_controller, check_permissions. It takes the decoded token and looks for a given permission:
# app/controllers/application_controller.rb
require 'json_web_token'

class ApplicationController < ActionController::API
  # ... existing code ...

  def can_read_admin_messages!
    check_permissions(@token, 'read:admin-messages')
  end

  def check_permissions(token, permission)
    permissions = token['permissions'] || []
    permissions = permissions.split if permissions.is_a? String

    unless permissions.include?(permission)
      render json: { message: 'Access is denied' }.to_json,
             status: :unauthorized
    end
  end

  # ... existing code ...
end
We use a before_action again to protect the admin endpoint:
# app/controllers/api/messages_controller.rb
module Api
  class MessagesController < ApplicationController
    before_action :can_read_admin_messages!, only: %i[admin]

    # ... existing code ...
end
With this, each route in our sample application is safe the way we wanted.
Testing Permissions
If you try to call the /api/messages/admin endpoint with the token we generated before, it will return a 401. Our token is valid, but doesn’t have the necessary permissions. Let’s create a new one!
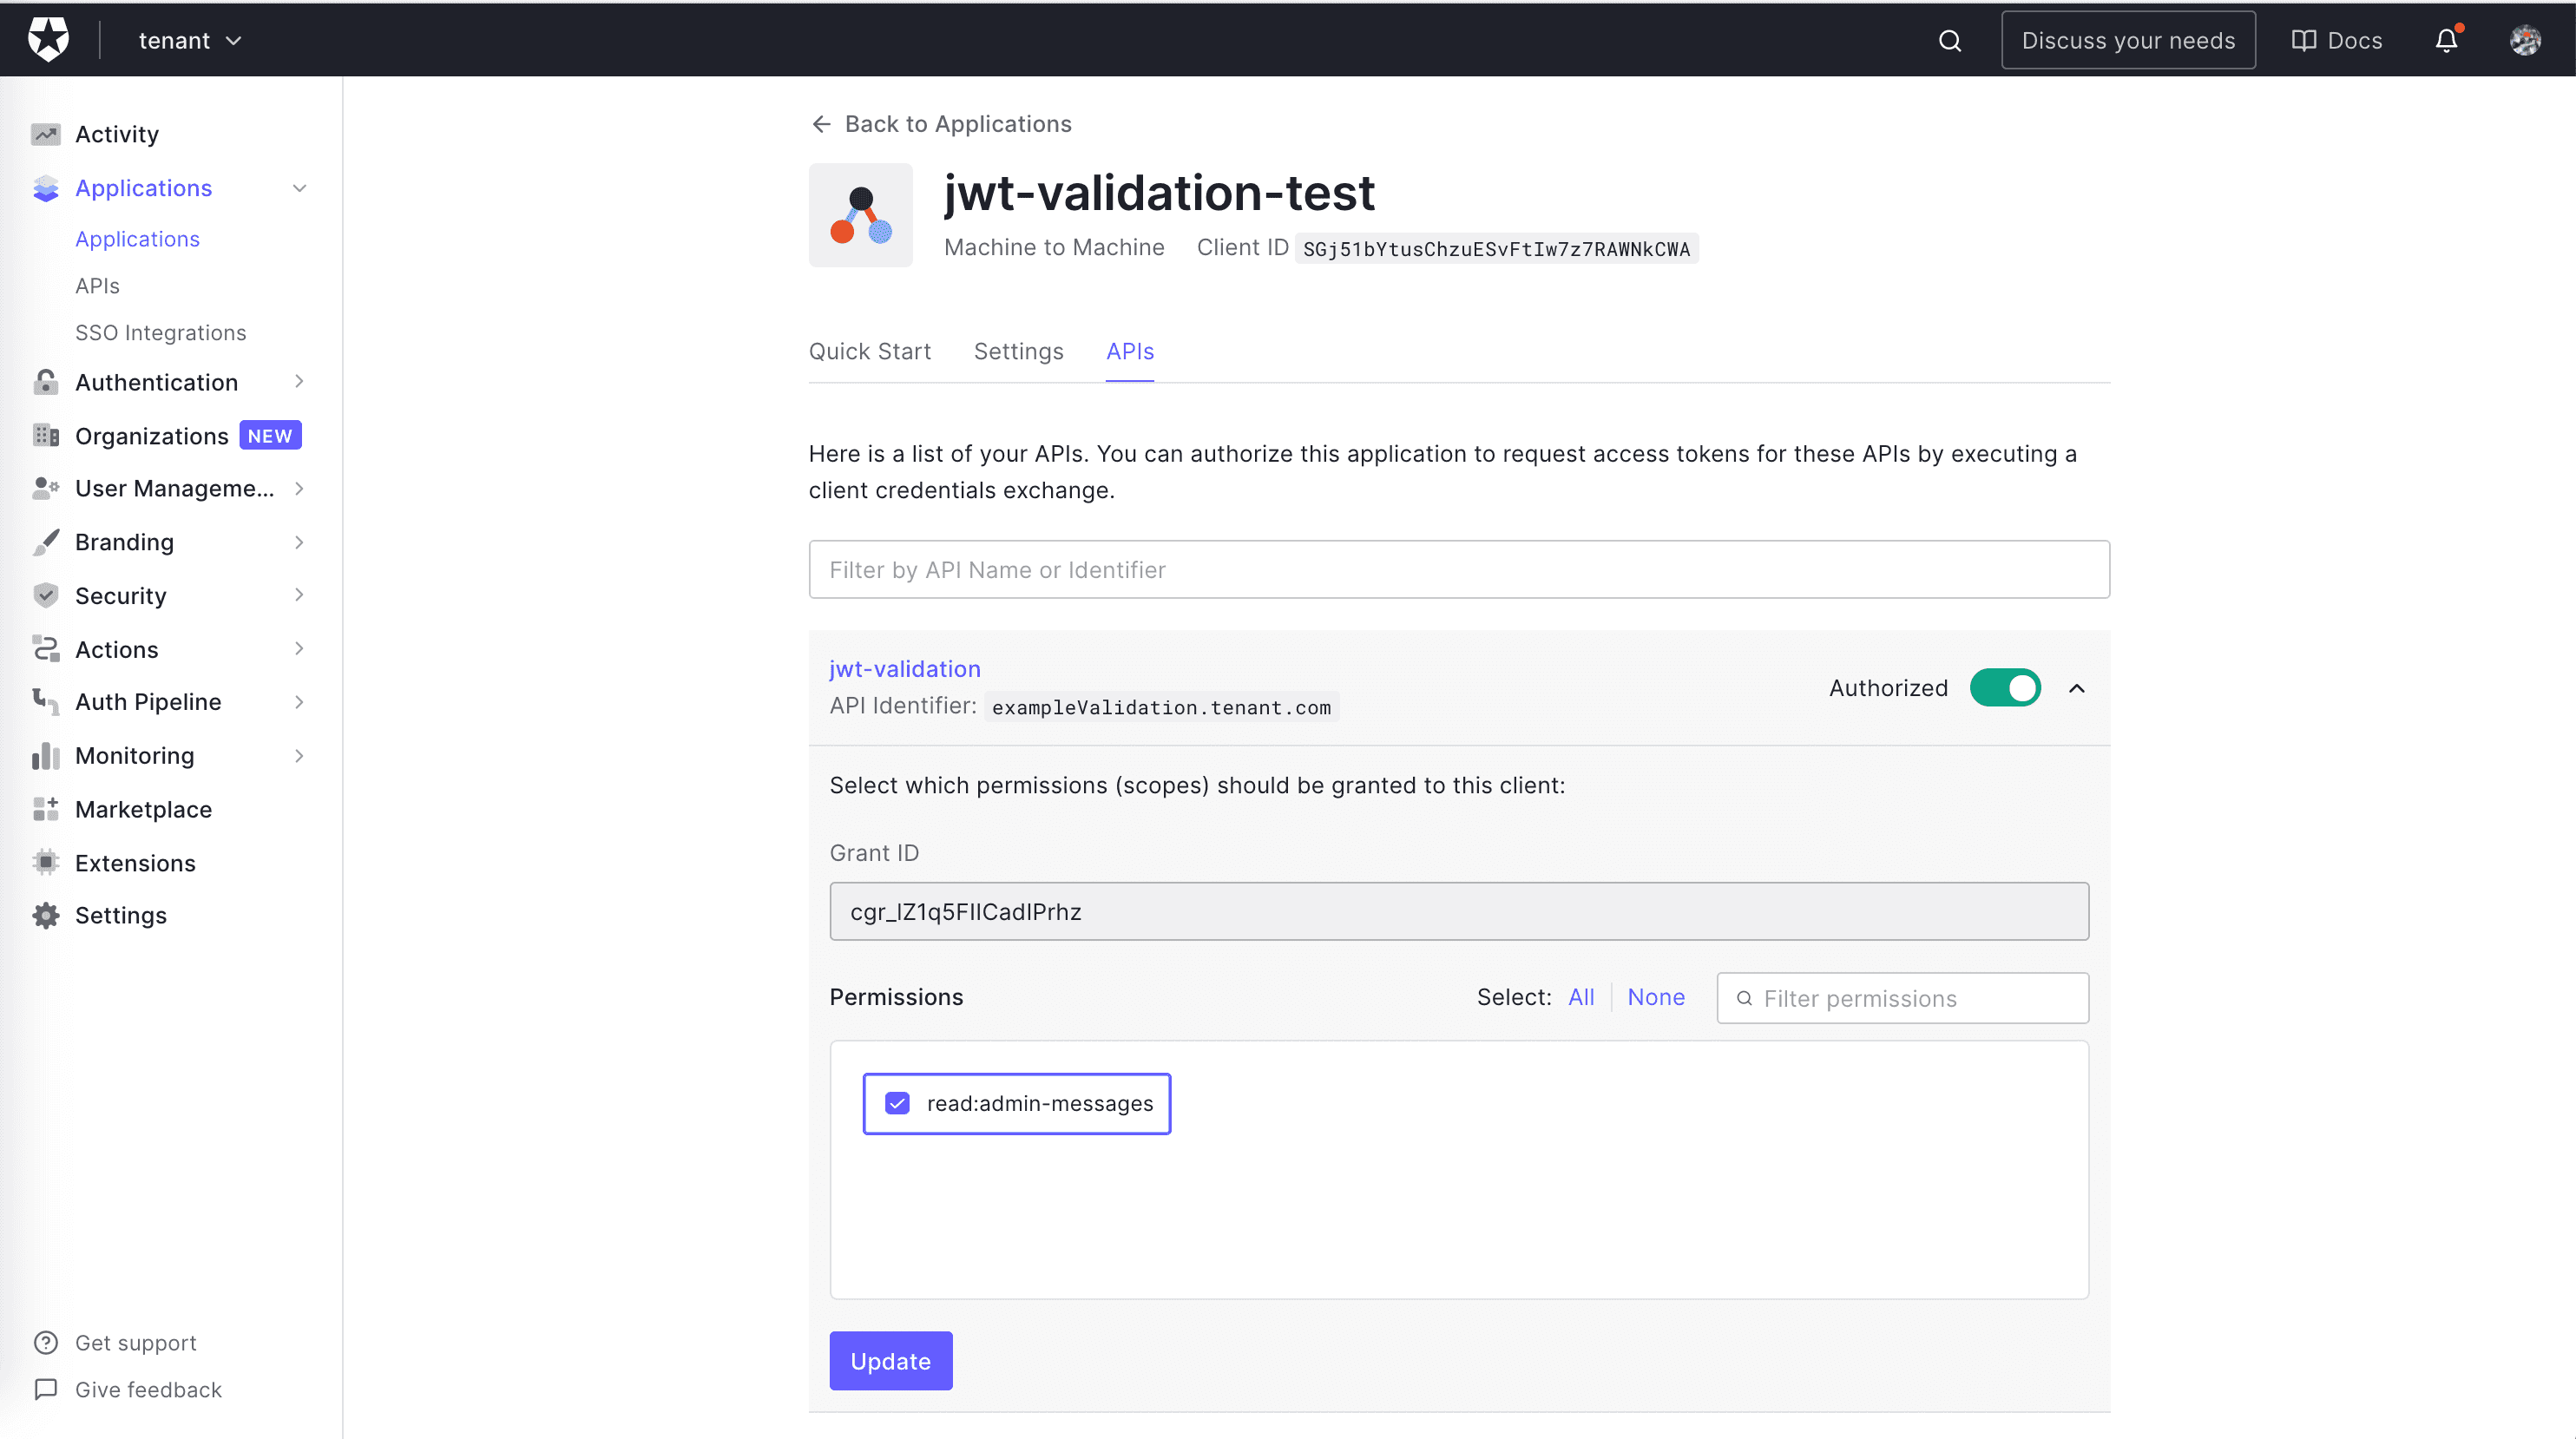
Back in your API configuration page on the Auth0 Dashboard, select the Machine to Machine Applications tab. You’ll get a list of applications, some of them with the (Test Application) label in the name. These applications are automatically created by Auth0 when you create an API there. They are meant as test clients from your API. One of them should have the Authorized switch on. Click the dropdown next to it and check the read:admin-messages permission:
Then, click the Update button, move again to the Test tab, and copy the new token that has been generated for you. Let’s try again:
export TOKEN=the-new-test-token
curl localhost:6060/api/messages/admin -H "Authorization: Bearer $TOKEN"
The request works now!
{"message":"The API successfully recognized you as an admin."}Conclusion
In this guide, we’ve added authorization to a Rails API by using Auth0 as an authorization server. Thanks to the jwt gem, we don’t have to invest much effort. We use the library to decode the bearer token that the API receives. After that, it’s a matter of checking the relevant routes before each request.
This post was published initially in Auth0.